Design the ribbon using the Ribbon Designer
Start the Ribbon Designer by executing the "Designer\Bin\RibbonDesigner.exe" application in the directory where you extracted the Windows Ribbon Framework for Delphi.
Note: The Ribbon Designer requires 3 third party tools for compiling and previewing the ribbon. These are the Microsoft Ribbon Compiler (UICC.exe), the Microsoft Resource Compiler (RC.exe) and the Delphi Command Line Compiler (DCC32.exe). The Ribbon Compiler comes with the Windows 7 SDK, but a version is also included in the Ribbon Designer directory. The Resource Compiler and Delphi Command Line Compiler come with Delphi 2010 and later. So you need to have Delphi installed. The Ribbon Designer should find these tools automatically on startup. However, if it fails to do so, it will show the Settings dialog box where you can specify the location of these tools manually.
Create a new project
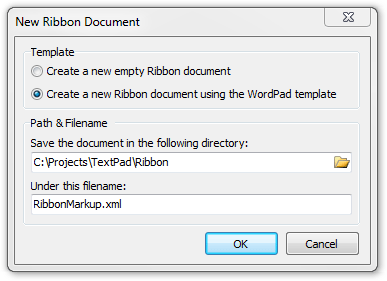
Choose "File | New (Ctrl+N)" to create a new project:

The Ribbon Designer comes with a WordPad template that contains a ribbon that is virtually identical to the one uses by WordPad in Windows 7. Make sure to select this template at the top of the dialog box.
Next, you need to specify a directory where you want to store the ribbon file. I suggest using a subdirectory of your Delphi project directory. In this example, our Delphi project will be stored in the "C:\Projects\TextPad" directory, so we put the ribbon in a "Ribbon" subdirectory. You also need to specify a filename for the ribbon document. Ribbon document files are XML files. You can use any extension for the document file, but Microsoft recommends using the standard .xml extension.
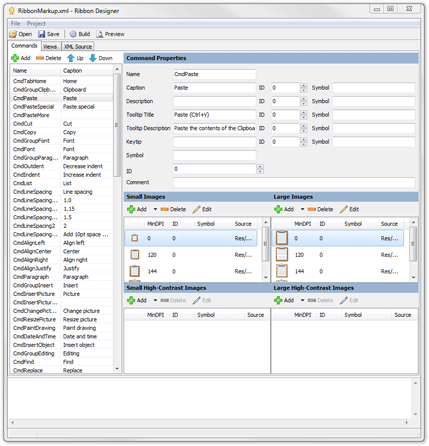
When you click OK, the ribbon document will be generated and all resources (images) used by the ribbon will be copied to the "Ribbon\Res" subdirectory. This can take a couple of seconds, after which your screen will look like this:
The main area of the screen is divided into 3 tabs:
- Commands: shows all the commands used by the ribbon. Commands are somewhat similar to Actions in Delphi. We will get to this in the next page.
- Views: the views used by the ribbon. A view is a visual representation of a set of commands. These views include the main ribbon as well as any context popups. Views will be explained in detail starting on the page Designing Ribbon Views.
- XML Source: the XML source of the ribbon document. This is a read-only view of the generated XML. You only need to access this tab if the ribbon compiler generates an error. The Ribbon Designer will try to keep you from generating invalid XML as much as possible. However, the ribbon compiler does more than checking for correctness of XML. Should the ribbon compiler generate errors, then you will see those in the message log at the bottom of the screen. You can use the line number information to locate the error in the XML Source view. See the MSDN documentation for a description of the possible errors.
Preview the Ribbon
Before we get into the details, lets build and preview the project. Choose "Project | Preview (F9)" or click the Preview button on the toolbar. The Ribbon Designer will now perform the following steps:
- Save the ribbon project to an XML file (RibbonMarkup.xml in this example).
- Call the Microsoft Ribbon Compiler (UICC.exe) to compile this XML file into a binary version (RibbonMarkup.bml), a header file (RibbonMarkup.h) and a resource script file (RibbonMarkup.rc).
- Call the Microsoft Resource Compiler (RC.exe) to compile the BML file and all related images files into a resource file (RibbonMarkup.res).
- Convert the generated header file (RibbonMarkup.h) to a Pascal file (RibbonMarkup.pas). This file will be used later in you Delphi project to access the ribbon commands.
- Create a Delphi project file for a DLL project containing the resource file (RibbonMarkup.dpr).
- Call the Delphi Command Line Compiler (DCC32.exe) to compile the Delphi project into a resource DLL (RibbonMarkup.dll).
The output of these processes will be shown at the bottom of the screen in the Output window. If all steps succeed, the Ribbon Designer will open the generated DLL and use it to create a preview form:

Not bad for about a minute work. With the preview form, you can test the ribbon and the application menu. Of course, nothing will happen when you press any ribbon buttons, but it will give you good idea of what the ribbon will look like in your application. The preview form also contains 4 tabs with which you can test the following functionality:
- Application Modes: you can specify multiple application modes for your ribbon (we will come back to this in more detail later). For example, WordPad has two application modes: the standard mode (mode 0) and a Print Preview mode (mode 1). The Print Preview mode is activated in WordPad when you select Print Preview from the application menu. You can activate Print Preview mode in the preview form by checking Application Mode 1 and unchecking Application Mode 0. Try it out and see what happens.
- Contextual Tabs: you can specify contextual tabs for your ribbon (again, more details follow later). Contextual tabs are a set of ribbon tabs that only appear in specific contexts. For example, in Word 2007/2010, a set of "Table Tools" contextual tabs will appear when you select a table in a Word document. WordPad does not have contextual tabs, so you cannot test them here now. However, if you design a ribbon with contextual tabs, you would be able to activate and deactivate those tabs here.
- Context Popups: you can declare several context popups in your ribbon document (more details follow). A context popup can contain a mini toolbar, a context menu or both. WordPad has 3 different context popups, depending on what is selected in the document. You can test these popups here. Just select the popup you want to see and it will pop up. Note that WordPad does not use any mini toolbars, just context menus.
- Colorize: the Ribbon Framework allows you to colorize the ribbon any way you want. Not just using the Blue, Black and Silver themes that you may know from MS Office. This tab allows you to experiment with different color schemes or create your own.
Now, we will show you how this ribbon has been designed. Close the preview window and go to the next page...

